|
Updating Versions Earlier than 4.1
|   |
|
Updating Versions Earlier than 4.1
| |
|
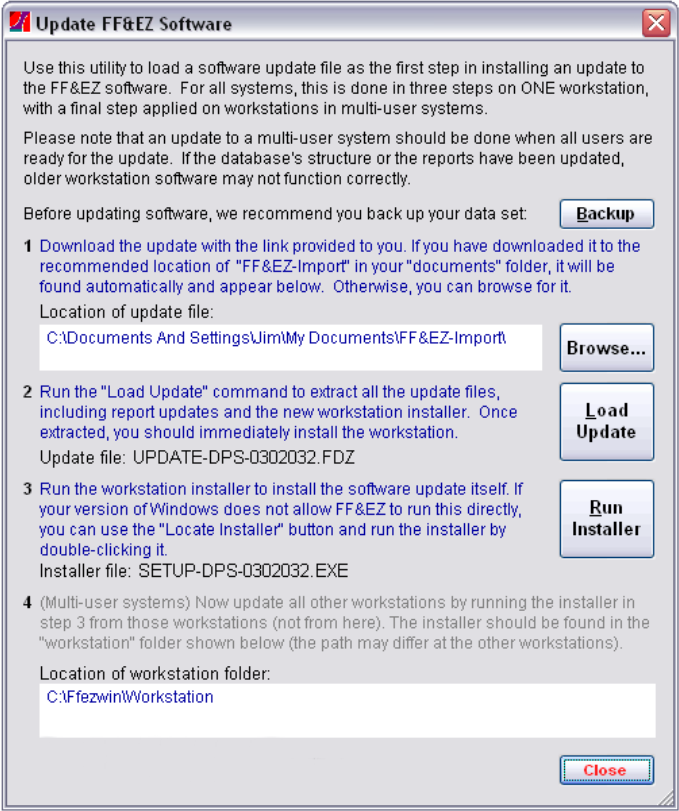
If your current version is numbered less than 4.1, FF&EZ will use this earlier version of the update process. Any version from the 3.2.33 to 3.2.134 will use this method (if your version is even earlier, you need to contact technical support for instructions). The primary difference between this update procedure and that used in the 4.1 version is that the incoming FF&EZ update uses a new installer and installs the software (not the data) into a different folder from previous versions. This means that 1) the installer will create a new, different icon to run FF&EZ and 2) you will want to uninstall the old version once the new one is in place. To save time, you can download the update file (see below) into your "Documents\FF&EZ-Import" "staging" folder. Otherwise it will download into your "Downloads" folder. Once this preliminary step is done, you run the Update Software option (accessed with the Utilities command on the main FF&EZ screen) Full instructions are below:
The Pre-4.1 Procedure
When FF&EZ offers to "locate" a file for you, the file will be automatically highlighted in the folder window that it opens. When the installation is complete, you will see a new icon on your Desktop, in addition to the old one. The new icon will be named either "FF&EZ 4 Design" or "FF&EZ 4 Design Purchasing" depending on your license. The old version still exists, but you will not be able to run it once the update is complete. Be sure to start FF&EZ with the new icon! See below for instructions for removing the old one. Important: If you have previously "pinned" the old icon to your Taskbar or the Start menu, you must "unpin" it and then pin the new icon. Do not use any old "pinned" versions until you do this, since they point to the old version (or nothing, if the old version is uninstalled). Most updates include some final changes that are done the next time FF&EZ runs. If you are on a multi-user system, be sure to run FF&EZ as soon as possible after installing an update, otherwise other users may see unfamiliar messages as the update happens. Note: The "Step 4" shown on the screen image is not needed on single user systems nor on "terminal server" or "cloud server" systems accessed through the Windows "remote desktop" service (see "Older Network Versions" below for the situation for which it is needed). After installing an update to the software and verifying that you can access it, we recommend that you do another full backup to a separate storage device. This will create a backup file with the new installer, which will be useful if you ever have a hardware failure. Removing the Previous Version and Icon Since versions 4.1 and later create a new "FF&EZ 4" icon and install the software in a new "programs" folder, you will want to eventually remove the old version to avoid confusion. This is the procedure:
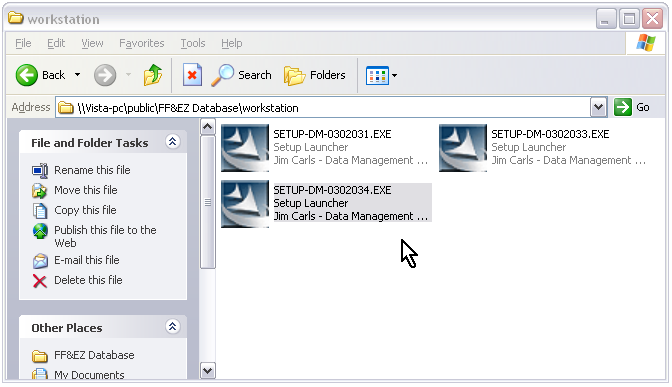
When the uninstall process completes, the old icon should be gone from the Desktop. Older Network Versions On older local area network multi-user versions of FF&EZ, the presence of the new installer triggers a flag on the other workstations, which will display a button that those users can use to install the workstation software (again, they do not need to do all the steps above—just run the "SETUP" installer using the button that appears). Note: this configuration is now rare. |