|
If you have not yet read the introductory material about importing data, please do so before trying to use this function.
FF&EZ's project data Import List command, which appears on the FF&E Worksheet and the Specifications screens, is used to import properly formatted external FF&E data. This can be in one of two major forms: 1) specifications (only) and 2) a fully defined project structure containing areas, rooms, objects and specifications. You can import either of these types on the two screens, but the default type for the associated screen is automatically selected when the utility opens.
These instructions assume that you have created a tab-delimited input file in the format and structure required by the import type you plan to use. If you need an example of the format of this text file, it is covered in Step 3 below. Full instructions for how to create an input file are covered in the previous topics, starting with Basics / Data Preparation.
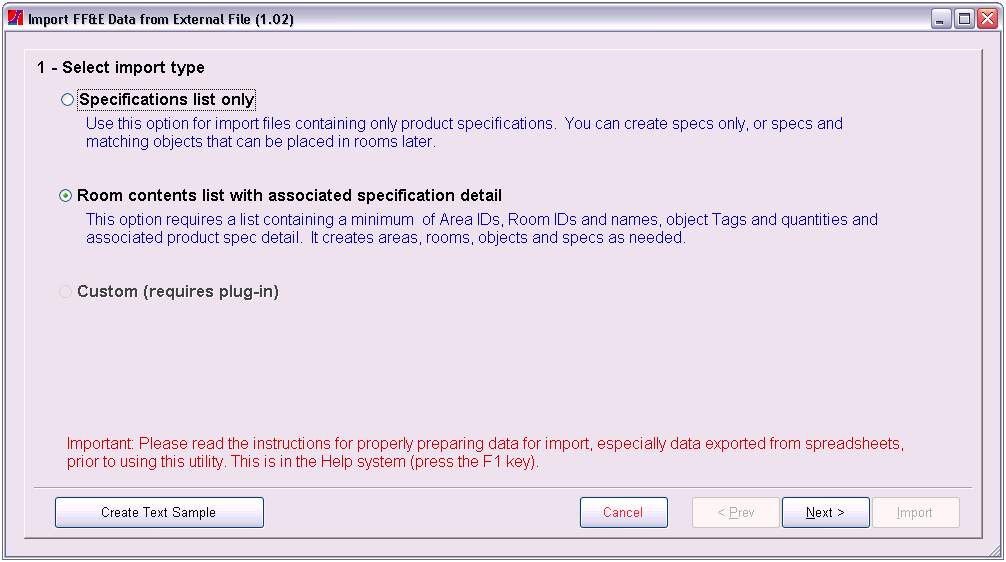
- From either the FF&E Worksheet or the Specifications List screen, select Utilities, then Import List. This will display the importer's first screen:

- The type of import will be automatically selected based on the screen from which you started, but you can choose either one. Note that a "hook" is included to allow a custom import plug-in to be developed at additional cost.
- If all you need is to create a sample file to use as a template, confirm or select the type of import you want to do (step 2) and then click on Create Text Sample. Allow the system to locate the file for you, then double-click to open it. You can copy the contents of the file and paste it into a spreadsheet to see the full structure and sample data.
- If you are ready to import, click on Next. Click Cancel if you are only generating a sample file.

- Click on the Select... button to locate your input file. Note: FF&EZ will look in the FF&EZ-Import folder (under your personal documents folder) first, so that is the most convenient place to locate your source file.
- Select any options that need to be changed from the defaults (the list of options is discussed below, after this section). Then click on Next to review the intermediate import results.

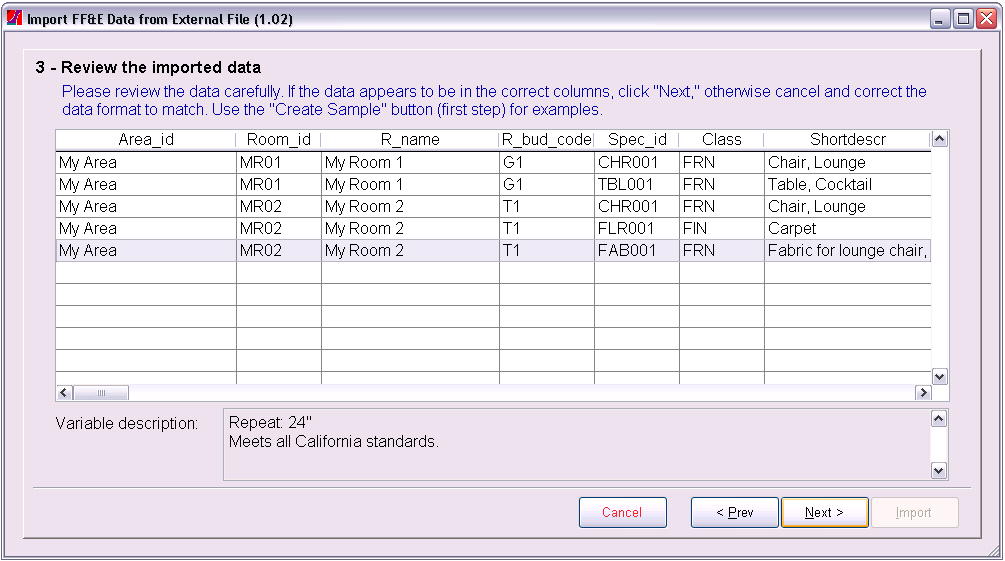
- The data should appear "clean" with all columns containing the data that you expect to see under the column heading. If the imported data contains a variable length field like the "long description," you can review that in the box at the bottom.
- Very important: Scroll down through the entire list, looking for any entry in which the first cell seems to contain incorrect or inappropriate data. This is an indication that the row above it contained an embedded carriage return and/or line feed character that terminated the data line prematurely. If this happens, the remaining data in that line is split into a new data record starting in the first column. If you see these, make a note of each occurrence (room and spec ID) and then cancel the import so that these can be corrected in the source file.
Warning: Continuing the import with "corrupt" data like this will create invalid entries in your project! We always recommend importing into an empty project if you have any questions about your data, especially if you plan to import into a project that is already "in progress." You can import from a temporary project into your "live" project later, using one of the Add> Import commands on the Room, Object or Specification screens.
- If the raw data seems to have been imported correctly, you can proceed to the final steps of importing the data into the project, by clicking on the Next button. This will display the last screen:

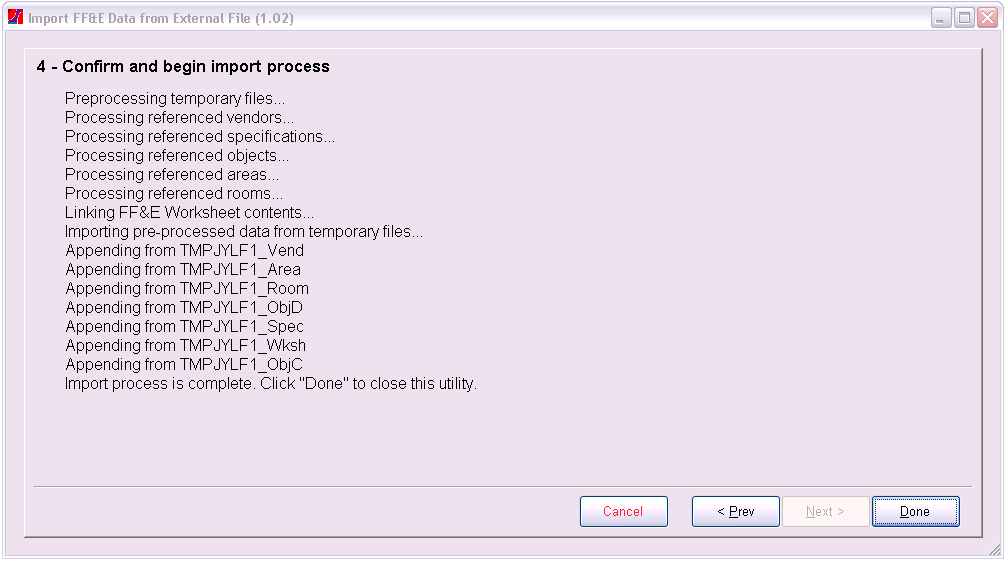
- To begin the final import process, click on the Import button. The system will begin processing the data to link it to existing entries and create new ones as needed. The messages that you see may differ, depending on what type of import you have chosen. During the import process, the utility also creates a log file with more details than are shown here. This includes a list of items that already existed in the system (vendors, rooms, objects or specs). These will not be created again, although any additional usages of objects in rooms will be created from your data.

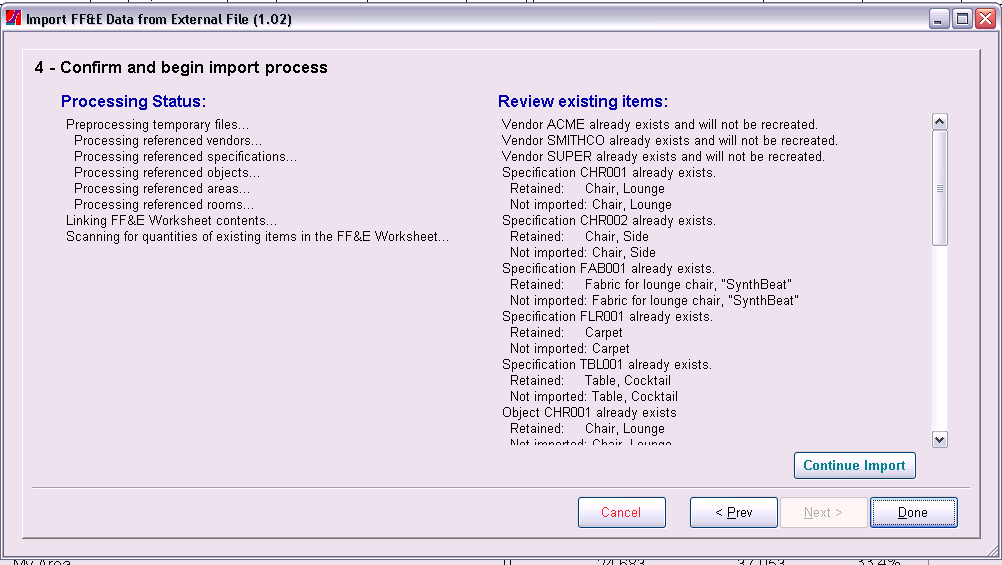
- If the importer finds that existing items are included in the import data, it will display them in a window that you can scroll as needed to review them (see image above). If not, you will see the image in step 12. Although you might expect to see existing vendors, and existing areas and rooms when importing worksheet data into an already active project, you should pay special attention if you see existing specifications (and their related objects).
The review list will show the short descriptions from both the existing items and from the import data. If any of these are obviously different products, you should cancel the import and change the IDs used to identify them. Otherwise, the importer will ignore the imported items and protect those that already exist from being changed. It will, however, import worksheet occurrences for the items as an "update," which is not what you want if the items are not the same. After reviewing the existing items, you can choose to continue the import by clicking on the Continue Import button.

- If the import is successful, the system will tell you. If a problem occurred or if you cancel after reviewing the "existing items" list, it will be recorded in the log file and the import process will abort, leaving no data changed in your project.
- The log file is saved to the "FF&EZ-Import" folder under your personal documents folder and replaced each time an import is executed. If your import also updated existing quantities in the project, we recommend that you view this file and save it to a permanent location in case there are any questions about the original quantities.
- The new entries in the system will appear as soon as the underlying screen updates.
Import Options
The following options appear in the second step of the import process and control how some of the import data is used, or how blank data is handled for required fields.
|
Check vendors using the vendor Alternate ID instead of the Vendor ID?
|
This is a crucial setting that will depend on what type of vendor ID is being used in the source data:
If this is the first time you have imported data, and your data includes new vendors (i.e., their vendor IDs do not yet exist in the FF&EZ Vendor List), you have two choices (and the same choice should be used in any future imports from the same source):
- If the vendor IDs in the source data are acceptable to you for use in FF&EZ's alphanumeric ID field, leave this option unchecked. If a vendor needs to be created during the import process, the incoming vendor ID will be used as its primary ID.
- If the vendor IDs in the source are numeric or otherwise not particularly meaningful, and you wish to begin using alphanumeric IDs that are more readable or which are abbreviations of the vendor name, select this option. If the incoming vendor ID is not found among the existing "Alternate Vendor ID" values in FF&EZ, it will be treated as a new vendor. The incoming vendor IDs will be placed in the "Alternate Vendor ID" field in the Vendor List, but the system will also copy that ID into the primary Vendor ID field (which cannot be blank) as a temporary ID. Later, you can begin editing the vendors to replace the temporary Vendor ID with one more suitable to your needs. If you plan to do further imports from the same source, leave the alternate IDs in place so they can be used to determine if any incoming vendors in those future imports already exist.
As you do later imports, you can choose the option that matches the way your existing vendor list was created:
- If the source data uses the same vendor IDs as the primary vendor ID in FF&EZ, leave this option un-checked.
- If the source data uses a different vendor ID system that matches the "Alternate Vendor ID" on the Vendor screen, select this option. This will be the case if you imported the original vendors with this option selected (option #2 above),
- An import from a completely different source will need to match either the primary vendor ID or the alternate, otherwise new and possibly duplicate vendors may be created if no match occurs.
When importing a set of data, all vendor IDs in that set of data must be checked against the primary ID or the alternate ID, but cannot mix both. If you have data with a mix of both types of IDs to test, separate it into two batches and use the option that applies to the kind of ID in each batch.
If you accidentally create new vendors when an existing vendor should have matched, you can use the Reassign Vendor utility (on either the Vendor List or the Specification list) to reassign the new specifications to the existing vendor. The difference is whether all specs from that vendor are reassigned or only those in the current project. A vendor can be deleted if no specs point to it.
|
|
Create objects to match primary specs (if they don't exist)?
|
Typically, you always want to do this (and this is required for the FF&E Worksheet import). If you do not, you will have to create objects for each spec that you want to place in the worksheet.
However, if you plan to import specs that are to be used only as secondary components (such as fabrics for use in upholstered furniture), you can import them separately and uncheck this option. This will only create the spec entries, but no objects.
|
|
Use imported "Code" as object code instead of spec code?
|
If you include an optional code value for each spec, you have the option of having it saved into the object's "Code" field instead of the spec. This might be appropriate if the code applies only to the whole object. Please note that as of this writing, only the spec code automatically transfers to order items created from the FF&E Worksheet.
|
|
Replace blank "Unit" fields with:
|
The "Unit" is a required field, so the default entry for any lines that do not have a value for this field is shown here. Note that the unit is used for both the spec and the object (if any) created from that spec. This is typically the desired result, but you can change either after the import is complete.
|
|
Replace blank "Class" fields with:
|
(Worksheet import only) The object's "Class" is a required field, and the default entry for any lines that do not have a value for this field is normally "FRN" for "furniture." You can make it some other default value (again, only where the value is empty), but the value must match one of the classes that are available in the system. See the entry in Import Field List.
|
|
Scope of changes
|
(Worksheet import only) The import process normally only creates items that do not exist yet. However, you can use this option to also update quantities for items that already exist in the Worksheet.
|
|
|
|
|

